How to Dye Fabric Using Mimosa Bark
Natural dyeing is one of the oldest ways to add color to textiles. Instead of relying on synthetic pigments, natural dyers can extract color from plants, bark, roots, leaves, flowers, and other botanical materials. Mimosa bark is an interesting natural fabric dye source because it contains tannins that can interact with textile fibers and mordants. Research has specifically examined Mimosa tenuiflora extracts for dyeing cotton fabrics, including the effects of different mordants on color and fastness.
Depending on the fabric, concentration, dye-bath conditions, and mordant, Mimosa bark can produce earthy brown shades as well as softer reddish, rose, and pinkish tones.
In this guide, you’ll learn how to prepare Mimosa bark, create a fabric dye bath, prepare your textile, and experiment with different techniques for achieving richer or lighter colors.
Note: Natural dyes are variable. The exact shade can change according to the plant material, fiber, water chemistry, temperature, extraction time, and mordant. Always test a small piece of fabric before dyeing an important garment.
What Makes Mimosa Bark Suitable for Natural Dyeing?
Mimosa species are known for their tannin-rich bark. Tannins are polyphenolic compounds that can interact with textile fibers and metal salts used as mordants.
Mimosa tenuiflora extracts have been studied as textile colorants, with researchers testing their application to cotton and examining washing, rubbing, and light fastness.
This makes Mimosa bark particularly interesting for people experimenting with botanical textiles.
The resulting color isn’t necessarily one fixed shade. Depending on your process, you may see:
- Warm tan
- Golden brown
- Reddish brown
- Chocolate brown
- Rose brown
- Dusty pink
- Muted pink
- Plum or purple-brown undertones
The fun of natural dyeing is that small changes in the process can produce noticeably different results.
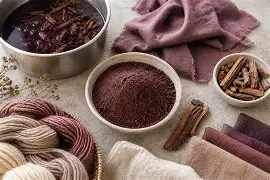
What You Need for Mimosa Bark Fabric Dye
Before beginning, gather your materials.
Basic supplies
- Dried Mimosa bark
- Natural-fiber fabric
- Large stainless-steel or enamel pot
- Water
- Kitchen scale
- Wooden or stainless-steel stirring utensil
- Strainer or fine mesh bag
- Heat source
- Gloves
- Separate containers for washing and rinsing
- Optional mordant
For your first experiment, use a small piece of cotton, linen, wool, or silk rather than an entire garment.
Which Fabrics Work Best?
The type of fiber you choose can have a major effect on the final color.
Cotton
Cotton is a cellulose fiber and is popular with beginners because it’s inexpensive and easy to work with. However, cellulose fibers generally require more preparation to achieve strong, durable natural-dye results.
Linen
Linen can produce beautiful earthy shades and works particularly well for natural textile projects.
Wool
Wool is a protein fiber and often absorbs natural dyes more readily than cellulose fibers.
Silk
Silk can produce particularly rich and luminous colors because of its protein structure.
Natural dye references generally distinguish between protein fibers such as wool and silk and cellulose fibers such as cotton and linen because mordanting approaches can differ.
Step 1: Prepare Your Fabric
Before making your dye bath, wash the fabric thoroughly.
This removes:
- Dirt
- Oils
- Manufacturing residues
- Finishing agents
- Other substances that could interfere with dye absorption
This process is commonly called scouring.
Use a mild detergent and rinse the fabric thoroughly. Your fabric should be clean and wet before entering the dye bath.
For a particularly important project, test your preparation method on a small swatch first.
Step 2: Weigh Your Fabric
Weigh the dry fabric before dyeing.
This is commonly referred to as Weight of Fabric (WOF).
For example:
100 grams of dry fabric = 100% WOF
Recording the weight gives you a useful reference when deciding how much bark, mordant, and water to use.
Keeping a dye journal is especially useful because natural dyeing is variable. Recording your bark quantity, water volume, temperature, dye time, fabric type, and mordant allows you to reproduce successful results.
Step 3: Prepare the Mimosa Bark Dye Bath
Place the dried Mimosa bark into a large stainless-steel or enamel pot.
Add enough water to completely cover the material.
Allow the bark to soak before heating. A longer soak can help the water penetrate the plant material and extract more color.
Then gradually heat the mixture.
Avoid aggressively boiling the material. A controlled simmer or hot extraction is generally easier to manage.
Allow the bark to extract for approximately 45–90 minutes, depending on the material and the strength of color you’re trying to achieve.
After extraction, strain the liquid carefully.
The resulting liquid becomes your Mimosa fabric dye bath.
Step 4: Create a Stronger Dye Bath
If you want deeper browns, concentrate your extraction.
There are several ways to increase color intensity:
Use more bark
A higher proportion of bark relative to fabric can produce a stronger dye bath.
Extract for longer
A longer extraction can allow more compounds to move into the water.
Perform multiple extractions
Instead of discarding the bark after the first extraction, you can add fresh water and extract it again.
Combine the resulting dye liquids if you want a stronger overall bath.
Keep notes of every extraction so you know what produced the best result.
Step 5: Consider Mordanting
A mordant is a substance used to improve the interaction between a dye and textile fibers.
This can be particularly important with cellulose fabrics.
Tannin-based dyeing systems are commonly used with cotton and other cellulose fibers, while alum is frequently used as part of mordanting processes.
Because Mimosa itself contains tannins, it is an interesting material for natural dye experiments.
However, don’t assume that the presence of tannins automatically makes every fabric highly colorfast. Research on Mimosa tenuiflora dyeing has found that mordant selection affects color characteristics and fastness.
Step 6: Mordant Cotton and Linen Carefully
Cotton and linen generally benefit from additional preparation because cellulose fibers do not interact with alum in the same way protein fibers do.
One established approach is a tannin → alum sequence.
Natural dyeing references describe tannin as useful for preparing cellulose fibers before an alum mordant because the tannin can provide sites for subsequent mordant interaction.
For beginners, commercially prepared tannin and alum are easier to control than trying to improvise chemical mordants.
Always follow the manufacturer’s handling instructions and use appropriate protective equipment.
Step 7: Add the Fabric to the Dye Bath
Once your dye bath is ready, completely wet the fabric.
Then place it into the Mimosa dye bath.
Make sure the fabric has enough room to move freely.
This is important because tightly packed fabric can produce uneven coloration.
Gently move and turn the fabric periodically so that the dye reaches the fibers evenly.
Step 8: Control the Color
This is where natural dyeing becomes especially interesting.
If you want lighter brown or pink tones, remove the fabric sooner or use a weaker dye bath.
If you want deeper brown, allow the fabric to remain in the dye longer or use a stronger extraction.
You can also experiment with repeated dyeing.
For example:
First dye bath → rinse → dry → second dye bath
Repeated dips can gradually build color without making the process too aggressive.
How to Achieve Rich Brown Shades
For deep earthy browns, focus on concentration and time.
Try:
- A relatively strong Mimosa bark extraction.
- Thoroughly scoured fabric.
- Proper mordant preparation where appropriate.
- Longer immersion.
- A second dye bath if additional depth is required.
Mimosa tannins can contribute to brown and reddish-brown coloration, making the material particularly interesting for earthy textile palettes. Natural-dye references also identify Mimosa among tannin sources associated with red-brown tones.
Brown shade progression
You may see a progression such as:
Light tan → warm beige → golden brown → reddish brown → deep brown
Your exact result will depend on the material and dyeing conditions.
How to Achieve Soft Pink and Rose Tones
Pink is usually more subtle than brown when working with bark dyes.
To experiment with pinkish shades, try:
- Using a lighter dye concentration
- Shorter dye-bath times
- Using a pale natural fabric
- Testing different mordant conditions
- Allowing the fabric to dry between dyeing sessions
- Diluting a concentrated dye bath
A reddish-brown dye bath can sometimes leave a softer rose or dusty-pink appearance on lighter fibers.
The important thing is to test rather than assume.
Natural dyes can behave differently on cotton, linen, wool, and silk, so create small swatches before committing to a larger project.
Can pH Change the Color?
Yes, pH can influence natural dye chemistry.
The same botanical dye can sometimes produce different visual results under acidic, neutral, or alkaline conditions.
However, pH experiments should be approached cautiously.
Rather than immediately adding large amounts of household chemicals, create several small test baths and change one variable at a time.
For example:
- Swatch A: standard dye bath
- Swatch B: slightly altered pH
- Swatch C: different mordant
- Swatch D: longer dye time
This gives you a much better understanding of how each variable affects your fabric dye.
What Does Mimosa Bark Dye Look Like on Different Fabrics?
| Fabric | Possible Results |
|---|---|
| Cotton | Tan, warm brown, rose-brown |
| Linen | Beige, earthy brown, muted rose |
| Wool | Deeper brown and reddish-brown |
| Silk | Richer brown, rose, plum-brown |
| Hemp | Earthy tan and brown |
These are general possibilities, not guaranteed colors. Fiber preparation, dye concentration, mordant, water chemistry, and extraction conditions can all change the final shade.
Step 9: Let the Fabric Cool
Once you’re happy with the color, remove the fabric carefully.
Allow excess dye to drain back into the pot.
Then let the fabric cool.
Some natural dyers allow dyed materials to rest in the bath for several hours or overnight. This can increase color depth, but it can also make results less predictable.
For your first experiment, keeping the process controlled and recording your results is usually better than immediately using very long soaking times.
Step 10: Rinse the Fabric
Rinse the fabric gently in cool or lukewarm water.
Continue until the water becomes considerably clearer.
Don’t be alarmed if some loose color comes out during the first rinse. This is normal with many natural dyes.
Avoid aggressively scrubbing the fabric.
Step 11: Dry Your Naturally Dyed Fabric
Hang the fabric somewhere with good airflow.
For experimental pieces, drying away from intense direct sunlight can help you evaluate the initial color without unnecessary exposure.
Once dry, examine the fabric under different lighting.
You may notice that the color looks different when wet compared with when completely dry.
How to Improve Colorfastness
One of the biggest questions beginners have is whether natural fabric dye will remain permanent.
The answer depends on several factors.
Fiber preparation
Poorly cleaned fabric may prevent even dye absorption.
Mordant
The appropriate mordanting process can improve dye-fiber interaction.
Dye concentration
A very weak dye bath may produce beautiful color but little depth.
Washing
Harsh detergents and hot washing can accelerate fading.
Sun exposure
Natural dyes can gradually change when exposed to sunlight.
Research on Mimosa tenuiflora textile dyeing has specifically evaluated washing, rubbing, and light fastness, showing why these properties should be tested rather than assumed.
Troubleshooting Common Problems
The Fabric Is Too Light
Try:
- A stronger dye bath
- More dye material
- Longer extraction
- Longer immersion
- A second dye bath
The Fabric Is Uneven
Uneven color can happen when the fabric is folded or crowded.
Try:
- Fully wetting the fabric beforehand
- Using a larger dye pot
- Stirring regularly
- Keeping the fabric moving
- Making sure the dye liquid can circulate around the entire textile
The Color Is Too Brown
If you were hoping for pink, your dye bath may simply be too concentrated.
Try a lighter extraction or shorter dye time.
Remember that natural dyeing isn’t always about producing a single exact color. The subtle variations are part of the appeal.
The Color Fades After Washing
Review your preparation and mordanting process.
Also consider how you’re washing the finished fabric.
Use gentle washing methods and avoid unnecessarily high temperatures.
Tips for Better Natural Dye Results
1. Always Make a Test Swatch
This is probably the most important rule.
Don’t experiment for the first time on your favorite shirt.
2. Record Everything
Write down:
- Fabric type
- Fabric weight
- Bark weight
- Water quantity
- Extraction time
- Temperature
- Dye time
- Mordant
- Final color
3. Change One Variable at a Time
If you change the bark quantity, mordant, temperature, and dye time simultaneously, you won’t know which change caused the result.
4. Don’t Expect Every Batch to Match
Natural materials vary.
Two batches of bark can produce slightly different results because their chemical composition can differ.
5. Use Proper Equipment
Use dedicated dyeing equipment rather than cookware used for food preparation, especially when working with mordants or other dyeing chemicals.
Creating a Mimosa Bark Color Palette
One of the most enjoyable ways to explore this natural fabric dye is to create a shade card.
Start with one piece of fabric and divide it into several samples.
Try:
Sample 1: Short dye time
Sample 2: Medium dye time
Sample 3: Long dye time
Sample 4: Second dye bath
Sample 5: Different mordant
Sample 6: Diluted dye bath
Label every sample.
After drying, arrange them from lightest to darkest.
You could end up with a beautiful palette ranging from pale beige and dusty pink through reddish brown and deep earthy brown.
Why Natural Dyeing Is Worth Exploring
Natural dyeing offers more than simply adding color to fabric.
It allows textile artists to work directly with botanical materials and explore how plants, fibers, water, temperature, and minerals interact.
Mimosa-derived extracts have already been investigated for textile applications, including cotton dyeing, demonstrating that Mimosa tenuiflora has legitimate relevance as a botanical colorant.
The biggest advantage is experimentation.
You aren’t simply following a recipe to obtain one predetermined color.
You’re learning how a natural material behaves.